
This is a guide explaining how to dual-boot a system with both Windows and Linux, using grub.
Introduction
Dual-booting is quite common and really usefull, the idea is to be able to launch multiple OS from a single computer (motherboard). The main reason I personnally use dual-boot is that I prefer to work under Linux for security, convenience and its open-source nature. When I need to play games, I boot Windows. Let's hope that the Steam Deck popularity makes the Linux video game ecosystem a reality, thanks to Proton tool!
Choosing between a logical or physical disk
Before everything else, you first need to choose between using one or multiple physical drives.
Physical drive
If you use physical drives, you will need at least two disks (HDD or SATA). SATA is more costly than HDD and more performant but has less lifespan and storage capacity.
I recommend you to buy physical drives for efficiency, of course if you have access to the motherboard. It should be easy to plug two physicall drives, almost all today's motherboard support at least 2 SATA ports (to plug up to two SATA drives), and maybe some M.2 ports. For a good overview of the different SSD, check this article.
Logical drive
On the other hand you can use logical drives, which is the idea to decompose your drive into multiple independent partitions.
It is less performant than physical disks, but you can in theory emulate an infinite amount of disks.
To create new partitions, you can use the pre-installed Disks tool on Ubuntu.
Preparing the installation media
From there, you will need to have access to a desktop that is connected to the internet. We will create two installation media (two usb with at least 8GB) for Windows and ubuntu, that each requires ISO images. Those usb sticks will be later used by your desktop, to install the different OS. For the Windows ISO, download it through that page and for ubuntu you can find it here.
Now, the rest depend on which system you have downloaded the ISO images.
Windows
If the current desktop you are working with is running Windows, use the following guide to make the ubuntu installation media and Windows installation media.
Ubuntu
Otherwise, if the current desktop is running ubuntu, use the system Startup Disk Creator for the ubuntu installation media and WoeUSB for Windows.
Starting the OS installation

I recommend you to first start with Windows, because it has the bad habbit of messing up with other disks.
Plug the USB Windows installation on your desktop, reboot your computer and enter the BIOS menu. This one should be accessible by hitting the DEL key on your keyboard when booting.
From this menu you want to select UEFI boot, and make sure to not select LEGACY. Here we are making sure that the firmware choose the UEFI booting method, because it is the standard nowadays.
Go to the boot menu order, and check that your Windows USB key appears and has top priority. Now restart again the computer and you should boot on the USB installation media.
Note
Each constructor has its own menu so double-check how to acces your BIOS and modify the settings, for example DELL or MSI.
Once Windows is installed, shut-down the desktop, remove the usb, poweron the desktop, check in the BIOS that the Windows drive has highest boot priority, restart, you should boot on Windows.
Now repeat the same process to install Ubuntu on the second drive. Make sure that the usb Linux stick is plugged-in and has highest boot priority. When asked, choose UEFI installation (should be the default) instead of BIOS/LEGACY.
Note
This is not the role of this post, but if you need to setup disk encryption you should do that during installation.
Switching between different OS
From there you should have a working setup congratulation! But how can you easilly switch between the different OS?
With the BIOS
If you hit the F11 key after powering-on the PC, you should be able to acces the BIOS booting setup. From there you can select to boot from either Windows or Ubuntu. Double-check that the two OS are working as expectly.
With Linux
This guide is not over, we don't always want to acces the BIOS boot menu to change between OS right? Let me present to you GNU GRUB.
The grub tool aims to help you manage your multi-boot configuration, under your Ubuntu OS. That means that once everything is setup, you can make the Ubuntu drive top-priority in the BIOS and don't care of the Windows boot selection. We will see that there are more customization than just the raw boot menu from the BIOS.
Making your system aware of Windows
First of all boot on Ubuntu, we will check that the different disk are setup accordingly.
Run the following:
sudo fdisk -l
You should have multiple outputs, but we want to check for the Windows disk wich should look like this:
Disk /dev/nvme0n1: 477 GiB, 512110190592 bytes, 1000215216 sectors
Units: sectors of 1 * 512 = 512 bytes
Sector size (logical/physical): 512 bytes / 512 bytes
I/O size (minimum/optimal): 512 bytes / 512 bytes
Disklabel type: gpt
Disk identifier: ****

Device          Start        End   Sectors   Size Type
/dev/nvme0n1p1   2048     206847    204800   100M EFI System
/dev/nvme0n1p2 206848     239615     32768    16M Microsoft reserved
/dev/nvme0n1p3 239616 1000212589 999972974 476.8G Microsoft basic data
The most important for Linux is to be able to detect the first partition (EFI System).
It should be the first partition of size 100MB, with type EFI System.
If the type is different, for example Microsoft basic data (which can happen after a Windows boot repair), you can change that
using the Disks utility form Ubuntu.
Click on the 100M partition of the Windows disk, options and Edit Partition.
Now change it to EFI System and optionnally add a name Windows EFI system.
Now we will use a tool to make grub detect the window partition.
sudo apt install os-prober
Running os-prober should output something like this:
$ sudo os-prober
/dev/nvme0n1p1@/efi/Microsoft/Boot/bootmgfw.efi:Windows Boot Manager:Windows:efi
If the output is empty or does not mention Windows, check this thread.
Now we can update the grub configuration file:
sudo update-grub
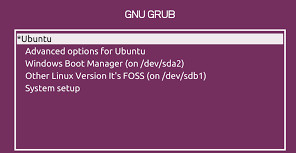
Reboot your PC, you should see the grub menu with a choice between ubuntu and windows.
If the grub menu does not appear, make sure to set the GRUB_TIMEOUT_STYLE parameter to menu in /etc/default/grub, an re-run update-grub.
grub menu customization
It is possible to customize some grub behaviour.
All the options are available in the /etc/default/grub file.
Let's say on Windows you have applications that launch on startup (for example Steam and big picture mode for gamers).
You can make the Windows boot by default by changing GRUB_DEFAULT for example:
GRUB_DEFAULT="Windows Boot Manager (on /dev/nvme0n1p1)"There are plenty of configurations to play with, check here for more details.
Even custom themes exists!
To go further
Some additionnal notes regarding Windows disk migration.
I recently stumbled into issues when I upgraded my Windows disk. Basically I used clonezilla to copy from my old (smaller) disk to the new (bigger) one.
Unfortunately it did not work as expected and was not able to boot on Windows anymore, nor using the boot-repair from Windows nor bootrec helped. Hopefully I was able to re-create the EFI/MSR partitions using diskpart.
Make sure to play with the offset parameter so the partitions are well aligned:
Device      Start        End   Sectors   Size Type
/dev/***     2048     206847    204800   100M EFI System
/dev/***   206848     239615     32768    16M Microsoft reserved
/dev/***   239616 1000212589 999972974 476.8G Microsoft basic data
Then bcdboot helps to populate the EFI files. A complete guide is available at this page.